
THERMAL LORE
- Dec 15, 2023
- 20 min read
Cross Country Magazine Issue 233
Dũng Bim translate
[Original English below]
Chỉ cần thoáng nhìn qua, bạn có thể biết được một đám mây đang phát triển hay đang tan đi không? Bạn có biết vì sao gió lại giảm khi thermal ở phía trước bãi cất cánh? Bạn bay thermal khi gió to, hoặc thermal trong một ngày ổn định thế nào? Phiên bản mới của cuốn sách kinh điển về thời tiết Understanding the Sky cho ta biết những điều cơ bản đôi khi không đơn giản chút nào.
TRÍCH TỪ SÁCH CỦA DENNIS PAGEN
TRANH MINH HỌA BỞI STEVE HAM

BẮT THERMAL
Roland Wacogne đang leo từ Pormenaz phía trước Mont Blanc Massif, Pháp. Bạn càng hiểu biết về thời tiết và những điều đang diễn ra xung quanh, bạn càng dễ đưa ra các quyết định đúng khi bay. Photo: Marcus King
Ba mươi năm trước, Dennis Pagen đã xuất bản cuốn sách đình đám cho các phi công thể thao Understanding the Sky. Kể từ lúc đó, cuốn sách đã được dịch sang hàng chục thứ tiếng và được đọc bởi hàng chục ngàn phi công.
Hai năm trước, team Cross Country magazine đã làm mới cuốn sách kinh điển này - và kết quả đã được xuất bản vào tháng 9 năm 2023. Họa sỹ nổi tiếng Steve Ham được mời để vẽ lại các bức tranh trong sách gốc của Dennis, thêm các tông màu để làm sinh động hơn các khái niệm kỹ thuật.
Trong đoạn trích này từ chương Kiến thức Thermal, Dennis giải thích một vài khái niệm cơ bản về cách thermal hoạt động, còn Steve mô tả bằng tranh vẽ.
Hình 1: Độ cao của Thermal
Độ cao tối đa thermal đạt được trong một ngày tại một địa điểm phụ thuộc vào một trong những yếu tố sau: độ cao của lớp inversion; độ cao hình thành mây; hoặc độ cao của lớp đoạn nhiệt khô.
Trong trường hợp thứ nhất chúng ta có thể thấy một lớp inversion ngăn sự phát triển của thermal. Khi thermal đạt tới lớp inversion này chúng sẽ tan và trở nên nhiễu động. Nếu nhiều khối thermal có độ ẩm bị ngưng tụ ở lớp inversion, độ ẩm sẽ tăng cho tới khi mây được hình thành - thường là các loại mây tầng tích stratocumulus. Các lớp inversion có thể có ở mọi nơi, từ gần mặt đất cho tới trên cao nơi thermal bốc lên.
Một vài khối thermal có thể đâm xuyên qua lớp inversion nếu lớp này không quá dày. Các thermal này sẽ là những khối mạnh nhất. Để có thể bắt thermal xuyên qua lớp inversion bạn cần tìm được lõi mạnh nhất và phải kiên nhẫn vì thermal sẽ giảm và tan dần tại lớp inversion.
Xiết chặt thermal cũng nên được dùng khi bắt thermal tại lớp inversion vì không khí ổn định tại tầng inversion sẽ làm thermal yếu dần từ những vùng yếu nhất phía ngoài khối thermal. Chỉ có phần lõi mạnh nhất của thermal có thể xuyên lên tiếp. Thường thì các thermal hợp lại tạo thành một khối rõ ràng hơn ở phía trên lớp inversion.

HÌNH 1. ĐỘ CAO CỦA THERMAL
Độ cao tối đa thermal đạt được trong một ngày tại một địa điểm phụ thuộc vào một trong những yếu tố sau: độ cao của lớp inversion; độ cao hình thành mây; hoặc độ cao của lớp đoạn nhiệt khô.
Trong trường hợp thứ hai, trong hình vẽ thermal đạt tới điểm sương và tạo thành mây bông cumulus. Khi điều này xảy ra, không khí xung quanh sẽ trộn lẫn với thermal khi năng lượng được giải phóng trong quá trình ngưng tụ. Thermal sẽ nhẹ bớt đi và loãng ra.
Độ cao của điểm sương phụ thuộc vào nhiệt độ của không khí và độ ẩm của thermal. Khi điểm sương gần mặt đất việc pha trộn sẽ làm độ ẩm được trải đều, thermal thường sẽ chứa độ ẩm tương đối giống nhau, do đó tạo nên mây có độ cao tương đương nhau. Những khu vực có trần mây khác hoặc thay đổi là có chứa các khối không khí khác biệt.
Trong trường hợp cuối cùng, thermal sẽ ngừng lại khi chúng gặp một khu vực không khí ổn định và sẽ từ từ suy yếu khi pha trộn với không khí xung quanh. Đây là trường hợp các thermal khô với việc lớp inversion không hiện hữu như trong hình.
Hình 2. Thời gian và sự thay đổi hàng ngày của thermal

HÌNH 2. BIẾN THỂ HÀNG NGÀY
Độ cao và kích thước của thermal thay đổi hàng ngày. Khi ngày trôi qua, thermal trở nên nhiều hơn, mạnh hơn, tồn tại lâu hơn và cao hơn
Thermal có thể gặp các luồng khí không cố định. Chúng ta có thể ví dụ, thông thường thermal sẽ cung cấp lực nâng trong khoảng bằng hoặc dưới mười phút. Thực tế rất hiếm khi chúng ta chỉ sử dụng một thermal để bay từ gần mặt đất lên tận trần mây, kể cả là ở sa mạc nơi thermal tồn tại lâu hơn, bởi vì trần mây thường sẽ cao hơn ở đó.
Trên thực tế khi điều kiện yếu, chúng ta phải chuyển từ thermal này sang thermal khác như các bậc thang để lấy độ cao.
Vào buổi sáng, thermal sẽ từ từ trở nên nhiều, mạnh, và lâu hơn. Vào giữa ngày, một trạng thái ổn định thường xuất hiện khi một nửa mây thermal đang hình thành trong khi một nửa khác thì đang tan tại cùng một thời điểm. Một đám mây thermal thường sẽ tồn tại khoảng 20 phút và được cấp năng lượng bởi hai hoặc ba thermal. Một thermal thường sẽ không đủ để tạo một đám mây. Do vậy thời gian của mỗi thermal sẽ là khoảng 6 đến 10 phút trong điều kiện bình thường.
Hình trên biểu diễn kích thước, trần mây và hình dạng mây trong suốt một ngày bình thường. Lưu ý là trần mây sẽ cao hơn khi không khí khô hơn. Đồng thời trần mây sẽ không thấp xuống vào buổi chiều khi thermal yếu đi. Trong điều kiện quá ẩm ướt, trần mây sẽ không cao lên vì không khí trên bề mặt không đủ khô.
Hình 3. Thermal trong gió
Ở các lớp gió chênh lệch nhiều hoặc gió không đều tại các tầng khác nhau, thermal có thể bị thổi tản ra, như trên hình. Khi đó, thermal có thể sẽ tập hợp lại ở phía trên mỗi tầng gió. Nếu gió chênh lệch ít, thermal sẽ nghiêng và có góc nghiêng cao dần lên theo hướng xuôi gió. Việc này làm việc bay thermal phức tạp hơn vì phi công cần phải chú ý tới vị trí lõi và tránh bị thổi dạt quá xa khỏi khu vực an toàn.
Trong điều kiện gió nhẹ và thay đổi liên tục, thermal có thể bị gió đẩy sang các phía khác nhau, hoặc thậm chí dạt vòng quanh khi chúng bị ảnh hưởng bởi các thermal kế bên và hợp lại với nhau. Thermal loằng ngoằng kiểu này thường gặp ở Brazil và các khu vực nhiệt đới khác. Ở các khu vực này thường là gió nhẹ, nhưng sức nóng sẽ tạo nên các thermal nhỏ hình thành ở những thung lũng khác nhau. Các khối thermal này khi bốc lên sẽ hợp lại với những khối khác và ảnh hưởng tới độ dạt vì chúng tới từ nhiều hướng khác nhau. Kiểu thermal phức tạp này đòi hỏi phi công phải dành toàn bộ kỹ năng và sự tập trung để có thể duy trì bên trong chúng, sau đó mới tới việc sử dụng chúng tối ưu. Các loài chim, các cánh dù khác và các vật bay trong không trung khác có thể giúp xác định vị trí của các khối thermal thoắt ẩn thoắt hiện này.
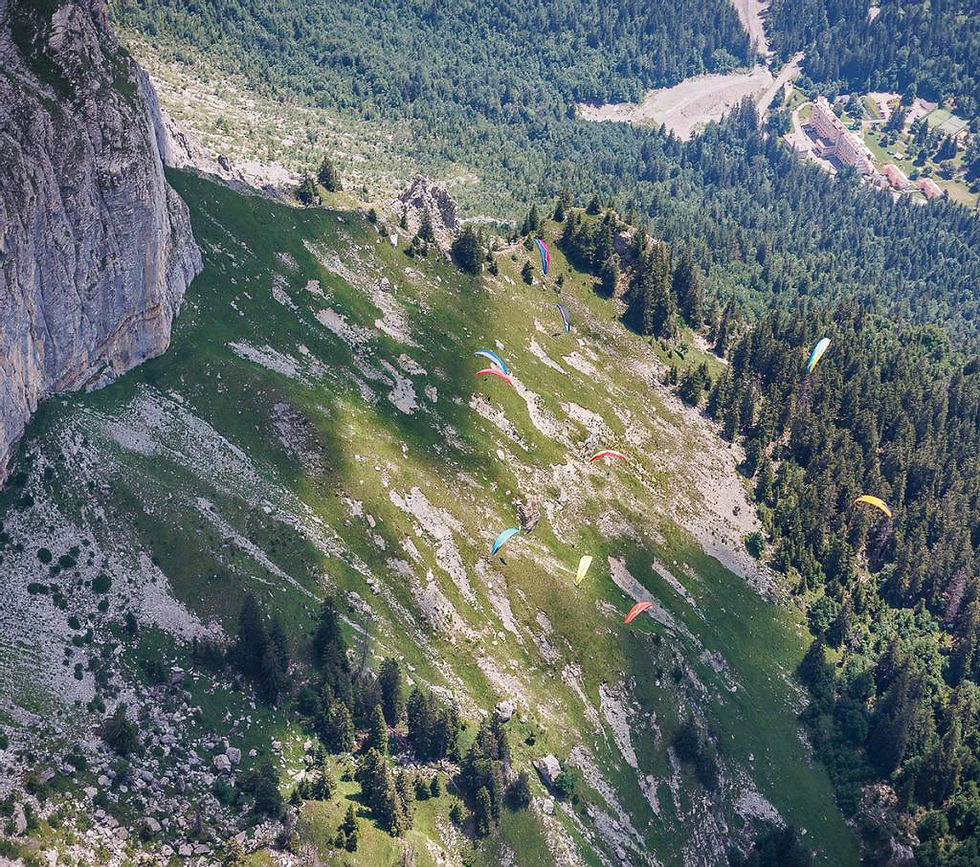
GO WITH THE FLOW
Các phi công bay thermal trên Plaine Joux, France. Ở một điểm bay với nhiều vách núi việc hiểu được thermal dạt như thế nào là rất quan trọng
(Photo: Marcus King)

HÌNH 3. THERMAL TRONG GIÓ
Ở các lớp gió chênh lệch nhiều hoặc gió không đều tại các tầng khác nhau, thermal có thể bị thổi tản ra
Hình 4 & 5. Đường đi và vòng đời của Thermal


HÌNH 4/5. ĐƯỜNG ĐI CỦA THERMAL
Đường đi của thermal mạnh và yếu với đỉnh núi. Bên cạnh đó, phần phía dưới của thermal gần mặt đất có thể di chuyển lên núi nhanh hơn phần phía trên cao
Gió thường sẽ gom các thermal vào núi. Lý do là gió thổi dạt thermal về hướng núi, cho tới khi chúng bay lên phía trên núi như trong hình. Đây cũng là lý do vì sao các vùng cao nguyên là nguồn thermal tốt.
Khi thermal di chuyển lên sườn núi, ta có thể nhìn đường đi của chúng qua cây cối hoặc theo dõi sự phát triển của chúng qua bóng mây trên mặt đất. Tuy nhiên, đôi khi sự rung lắc của cây ở trên đỉnh núi là do các vùng sink mạnh và cần tránh bay vào. Thường thì điều này xảy ra khi gió thổi ngang mạnh. Khi gió nhẹ, các ngọn cây xào xạc là dấu hiệu có thermal hiện diện.
Khi thermal bốc lên gần vách núi, chúng sẽ thường bám vào địa hình vì luồng không khí bị chặn ở mặt vách núi. Hiệu ứng này khiến thermal bốc lên theo vách đứng ở các hẻm núi và khe núi. Ngoài ra, sự kết hợp của gió núi và xu hướng của thermal di chuyển gần mặt đất có thể dẫn tới việc phần phía dưới của thermal di chuyển lên sườn núi trước phần phía trên như trong hình thứ hai. Điều quan trọng ở đây là thermal gây ra nhiễu động ở trên đỉnh núi có thể nằm ở phía ngược gió với đỉnh núi.
Khi thermal di chuyển tới đỉnh đồi hoặc núi, chúng thường làm nhẹ, dừng lại hoặc đảo ngược hướng gió ở đỉnh vì chúng hút các luồng khí nóng giống như một máy hút bụi lớn. Do đó, dấu hiệu của một thermal đang tới là sự thay đổi của gió. Có thể phải mất vài phút để chu kỳ gió này xảy ra khi thermal đi qua. Đôi khi chúng ta có thể nghe thấy tiếng chúng tới gần khi có tiếng cây xào xạc. Ở trên các vùng núi cao, thermal đến thường sẽ đi kèm với một cơn lốc bụi (dust devil) khi không khí quá nóng bốc lên. Những chu kỳ này diễn ra thường xuyên và rất hữu ích khi sử dụng chúng để đoán thời điểm thermal tới.
Hình 6. Thermal nhiều lõi

HÌNH 6. NHIỀU LÕI
Khi các lõi của thermal hợp lại, chúng có thể tạo thành một thermal mạnh hơn hoặc duy trì sự tồn tại của nhiều lõi khác nhau
Sự khác biệt đầu tiên và phổ biến nhất giữa thermal tự nhiên và thermal lý tưởng là sự hiện diện của nhiều nguồn thermal. Có vẻ như thermal bốc lên dễ nhất theo những đường mà các thermal trước đó đã đi qua. Điều này là do các khu vực sink được tạo bởi các bong bóng thermal.
Khi thermal thứ hai bốc lên, chúng thường bắt kịp được thermal trước đó bởi đi theo đường đi của thermal trước đã mở sẵn. Hành động này đã được mô phỏng bằng chất lỏng. Tới khi hai thermal gặp nhau, chúng có thể hợp lại hoặc duy trì sự tồn tại song song.
Điều này có thể gặp ở những thermal có nhiều lõi. Ở một vài trường hợp bốn hoặc năm lõi cùng bốc lên xung quanh với các khu vực sink hoặc lift yếu hơn ở giữa có thể được nhìn thấy bởi các nhóm dù thermal cùng nhau. Trong trường hợp nhiều lõi này, tốt ưu nhất là ở vùng lõi mạnh nhất, nhưng bạn sẽ khó đoán được lõi nào mạnh hơn nếu không có các dù khác hoặc chim bay cùng.
Hình trên mô tả hình dạng của một thermal có nhiều lõi. Các thermal này thường phát triển thường xuyên nhất khi có sự tác động của gió mặt đất, các vùng không khí nóng rộng lớn hoặc một lớp inversion làm thay đổi việc kích hoạt thermal của nguồn nhiệt ở mô hình thermal lý tưởng.
Với gió nhẹ, một thermal có thể được cấp năng lượng từ nhiều nguồn nhiệt xung quanh, đặc biệt là ở những khu vực có những cánh đồng nhỏ hoặc cây cản trở sự di chuyển của không khí vào thermal. Các vùng khí nóng khác nhau này sẽ được hợp lại với thermal ở những thời điểm khác nhau từ những hướng khác nhau và có thể tạo nên thermal nhiều lõi và làm tăng lên thời gian, nhiễu động và lực nâng. Điều này thường không phổ biến ở các vùng hoang mạc với các khu vực không khí nóng mạnh và rộng. Trên hình ta thấy nhiều nguồn nhiệt hợp lại với thermal ở các độ cao khác nhau.
Thermal thông thường xuất hiện theo hình dạng thuôn dài hoặc hình elip với một trục dài nghiêng theo hướng gió. Những thermal này cũng có thể có nhiều lõi. Lý do là hình thuôn dài này cũng có thể thu thập được các luồng khí nóng khi thermal di chuyển theo chiều ngang theo gió.
Khi thermal xuất hiện dưới dạng elip, phần lớn chúng sẽ có hình elip trong suốt cả ngày. Trong trường hợp này bay trực tiếp ngược hoặc xuôi gió sẽ dễ gặp vùng nâng mạnh nhất và giúp bạn tìm được lõi.
Hình 7. Đặc điểm của thermal và mây
Các đám mây thermal xuất hiện đầu tiên vào buổi sáng và tồn tại lâu nhất trên những nguồn thermal tốt nhất ví dụ các đỉnh núi. Tuy nhiên ngoại trừ các đám mây che phủ các hòn đảo và núi cao, mây thermal thường trải qua quá trình tan rã và hình thành liên tục.
Hình 7 cho thấy vòng đời cơ bản của một đám mây bông cumulus. Thông thường sẽ cần nhiều hơn một thermal để tạo nên một đám mây tồn tại hơn 20 phút, từ đầu tiên cho tới đến khi tan biến hoàn toàn. Miễn là còn thermal cấp độ ẩm cho nó, mây sẽ còn phát triển. Khi thermal ngừng, mây sẽ khô dần và tan biến.
Ở phần dưới của hình ta thấy sơ đồ hình dạng đám mây theo thời gian. Lưu ý là mây hình tam giác với đỉnh hướng lên trời là đang phát triển, còn đỉnh hướng xuống dưới là mây đang bắt đầu tan, vì khi thermal ngừng cấp độ ẩm từ chân mây, do đó sẽ khô dần lên. Tranh 1 tới 3 là mây đang hình thành. Tranh 4 và 5 là mây đang tan rã. Đừng nhầm lẫn giữa bước 5 và bước 1.
Các dấu hiệu khác của các thermal đang hình thành là các đám mây có đáy phẳng, tối, đường viền sắc nét và có đỉnh giống súp lơ phồng lên hoặc nước sôi phía trên các đám mây. Dấu hiệu của những đám mây sắp tan rã là những đường viền mỏng quanh đám mây, đặc biệt là ở gần chân đế, phần đáy mờ dần đi và kích thước mây giảm dần. Màu sắc cũng là dấu hiệu của chất lượng mây. Một đám mây đang phát triển và mạnh mẽ sẽ có màu xám hoặc trắng, sáng hoặc tối tùy theo cách nó đón ánh sáng mặt trời. Một đám mây sắp tan sẽ có vẻ hơi mất màu và có thể có màu hơi vàng hoặc nâu vì các hạt hơi ẩm nhỏ sẽ bay hơi trước khi mây bắt đầu tan và điều này làm thay đổi sự phản xạ ánh sáng.

HÌNH 7 VÒNG ĐỜI CỦA MÂY BÔNG CUMULUS
Vòng đời cơ bản của một đám mây bông. Thông thường sẽ cần nhiều hơn một thermal để tạo nên một đám mây bông.
Tranh 1 tới 3 là mây đang hình thành, tranh 4 và 5 là mây đang tan rã. Đừng nhầm lẫn giữa bước 5 và bước 1.
Lực nâng của thermal và chu kỳ có thể tương quan với độ cao và bề rộng của đám mây đang tích tụ. Thermal mạnh hơn sẽ có mây phát triển cao hơn, và thermal tồn tại lâu hơn sẽ làm mây lớn hơn. Tuy nhiên đặc tính của không khí cũng liên quan tới việc này, vì nhiều thermal ở đồng bằng được tạo ra bởi hiệu ứng tắc nghẽn của một lớp inversion.
Khi có quá nhiều độ ẩm tích tụ ở một tầng mây, do thermal có nhiều độ ẩm hoặc do lớp inversion giữ độ ẩm trong một vùng nhỏ, mây sẽ dàn trải và chuyển thành mây dạng stratocumulus. Thermal vẫn có thể xuất hiện trong điều kiện này nếu mặt trời có thể chiếu xuyên qua mây hoặc không khí lạnh di chuyển phía trên mặt đất ấm hơn. Trong trường hợp đó, các vùng tối hơn ở trên mặt đất (và các vùng có các đám mây cao) là nơi có thể tìm thấy thermal.
[Original English]
THERMAL LORE
Cross Country Magazine Issue 233
With a glance, do you know if that cloud is growing or dying? Do you know why the wind drops when the thermal is out front of launch? How should you fly windy thermals, or thermals on a stable day? A new edition of a classic weather book reveals the basics are not so basic after all.
WORDS BY DENNIS PAGEN
ILLUSTRATIONS BY STEVE HAM
CLIMBING OUT
Roland Wacogne climbs from Pormenaz in front of the Mont Blanc Massif, France. The more you know about the weather and what is going on around you, the easier it is to make the right flying decision. Photo: Marcus King
Thirty years ago Dennis Pagen published his groundbreaking textbook for sport pilots Understanding the Sky. Since then it has been translated into a dozen languages and read by tens of thousands of pilots.
Two years ago the team at Cross Country magazine set out to breathe new life into Dennis’s classic text – and the result is finally being published in September. Well known free-flight illustrator Steve Ham was brought onboard to recreate each of Dennis’s original line-art illustrations, adding colour and tone to help bring technical concepts alive.
In these extracts from the Thermal Lore chapter, Dennis explains some of the basics of how thermals work, while Steve lets his illustrating do the talking.
Fig 1: Thermal heights
The maximum heights that thermals reach on a given day at a particular place depends on one of several things: the height of an inversion layer; the height of cloud formation; or the height of the dry adiabatic lapse rate layer.
In the first case we see an inversion layer stopping the thermal climb. When the thermal reaches this inversion layer it often becomes turbulent as it disorganises. If many moist thermals are stopped at the inversion layer the humidity in the layer can increase until cloud is formed – usually of the stratocumulus variety. Inversion layers can be anywhere from close to the ground to well above normal thermal reach.
Some thermals may punch through an inversion layer if it isn’t too thick. These thermals will be the strongest in the sky. In order to ride the thermal through the gauntlet of the inversion layer it is necessary to locate the best core and be patient as it slows and disorganises in the inversion.
It will also be necessary to use a tight thermaling circle when riding a core up in an inversion because the stable air in an inversion erodes the weaker parts of the thermal along the edges. Only the central core shots of stronger lift can continue upward. Often the thermal will come together again to reform into a more coherent mass rising out the top of the inversion.
FIG 1. THERMAL HEIGHT
The maximum height that thermals reach on a given day at a particular place depends on one of several things: the height of an inversion layer; the height of cloud formation; or the height of the dry adiabatic lapse rate layer
In the second case shown in the figure the thermals reach the dew point level and form cumulus clouds. When this occurs much mixing with the surrounding air takes place as latent vaporization energy is released during condensation. The thermal loses its buoyancy and identity due to this mixing.
The height of the dew point depends on the temperature profile of the air and the humidity of the thermals. Since mixing near the ground spreads the humidity fairly evenly, thermals generally contain the same relative moisture and thus create clouds with bases nearly the same level. Different or changing cloud bases mean a different air mass is entering the area.
The final case whereby thermals stop their climb occurs when they enter neutrally stable air and gradually get weaker and weaker as they continue to mix with their surroundings. This is the situation with dry thermals when an inversion layer is not present as shown in the figure.
Fig 2. Thermal duration and daily variation
FIG 2. DAILY VARIATION
Daily thermal height and size changes. As the day progresses, thermals become more abundant, larger, longer-lived and higher
Thermals can be passing fancies or semi-permanent plumes. Again we can only generalise, but say that thermals providing lift for ten minutes or less is the norm. It is rare in fact for one thermal to carry us from very near the ground to cloudbase, even in desert conditions where thermals last longer, because cloudbase is usually much higher there.
In truly weak conditions we have to pass from thermal to thermal like stepping stones to gain altitude.
In the morning thermals are gradually becoming more abundant, larger and longerlived. By midday a steady state is normally reached whereby half the thermal clouds are building and half are dying at any point in time. A thermal cloud typically lasts for about 20 minutes and is fed by two or three thermals. One thermal usually will not form a lasting cloud. Thus we have a thermal duration of 6 to 10 minutes in normal conditions.
The figure illustrates the typical daily progression of cloud sizes, base heights and shapes. Note how the bases rise as the air dries out. Also note the bases do not come down in the evening as thermals weaken. In very moist conditions the bases do not rise because the surface air does not dry.
Fig 3. Thermals in wind
In a strong wind shear or in erratic winds at different levels a thermal may get broken apart, as shown in this figure. When this occurs the thermal may organise again above the shearing level. In weaker shear the thermals may tilt and be highly angled downwind. This state of affairs complicates thermaling because a pilot must constantly pay attention to the core location and avoid drifting too far from a safe haven.
In lighter variable winds thermals may get pushed this way or that by the wind, or even move around as they pick up influences from other nearby thermals and join together. Such snaky thermals are commonly found in Brazil and other tropical areas. In these areas there tends to be light general wind, but the general heating tends to produce light thermal blobs that often form in the dells, dales and vales of the tumbled terrain. These rising blobs join the rest of the rising mass and influence its drift as they join from various directions. Such elusive thermals demand all a pilot’s thermaling skill and attention in order to stay in them, let alone maximise their potential. Birds, other gliders and airborne fluff or debris can greatly aid in the location of these wishy-washy thermals.
GO WITH THE FLOW
Pilots thermal out of Plaine Joux, France. On a site like this with a series of cliff lines it is important to understand how the thermals drift as you climb
(Photo: Marcus King)
FIG 3. WINDY THERMALS
In a strong wind shear or in erratic winds at different levels a thermal may get broken apart
Figs 4 & 5. Thermal tracks and cycles
FIGS 4/5. THERMAL TRACKS
Strong and weak thermal paths above a peak. Plus, the lower part of a thermal close to the terrain can ‘ride up’ the slope, ahead of the higher part
Wind tends to collect thermals on the mountains. The reason for this is the wind drifts the thermal toward the mountain, at which point it rises above the mountain as shown in this figure. This is another reason why the high ground is a good source of thermals.
When thermals climb up a slope we can often see their tracks in the trees or watch their progress through the ground cover. At times, however, vigorous activity in the trees at mountain peak level is caused by fast moving sink and should be avoided. Usually this occurs in stronger horizontal winds. In lighter winds tree tops rustling identifies a thermal presence.
When thermals rise near a slope they tend to hug the terrain because the inflowing air is blocked on the slope side. This effect causes thermals to ride up the walls of canyons and ravines. In addition, the combination of upslope breezes and the tendency for the thermal to ride close to the terrain can result in the lower portion of the thermal riding up the slope in front of the higher portion as shown in the second figure. The important point here is that thermals that show themselves as disturbances on the crest may be located upwind of the crest.
As thermals approach the top of a hill or mountain they often reduce, stop or reverse the incoming wind as they suck up warm air like a big vacuum cleaner. Consequently, one sign of an approaching thermal is this change in wind. It may take several minutes for this wind cycle to occur as thermals pass through. Sometimes they can be heard approaching as they rustle through the brush. On high mountains the approach of a thermal is frequently accompanied by a dust devil as superheated air lifts off. These cycles are often very regular and it is useful to time them to predict thermal approach.
Fig 6. Multi-core thermals
FIG 6. MULTIPLE CORES
Once multiple thermals are joined together they may combine their efforts or somewhat maintain their own identity to exhibit multiple cores
The first and most common difference we find between nature and the ideal thermal is the presence of multiple thermals. It seems that thermals rise most readily in paths already taken by previous thermals. This is due to the general area of sink caused by the bubbling thermals.
When a secondary thermal rises it usually catches up to the preceding thermal because of favourable motions in the wake. This action has been demonstrated in visible fluids. Once two thermals are joined together they may combine their efforts or maintain their own identity.
This can be seen in the many thermals that exhibit multiple cores. In some cases four or five cores will be rising at once with areas of sink or lesser lift in between as indicated by a group of gliders thermaling together. In such a multiple core situation it is desirable to be in the strongest core, but you may not know there is a stronger core if other gliders or birds are not around.
This figure depicts a hypothetical shape of a multiple-core thermal. Such thermals seem to develop most often when ground wind, large expanses of heated air or an inversion alter thermal production from the tidy little point source of the ideal model.
In lighter wind a thermal may be fed by several local heat sources, especially in areas with small fields or trees blocking the free flow into the thermal. These various warm areas add to the thermal at different times from different directions and can cause it to have several cores and surges of intensity, turbulence and lift. This action is less common in desert areas with wide expanses of strongly heated air. The figure shows various feeds joining the thermal at different heights.
Often thermals appear to be oblong or elliptical shaped with a long axis oriented towards the wind. Multiple cores can be found in such thermals. The reason for the oblong shape may be the picking up of extraneous bits of warm air as the thermal moves horizontally in wind.
When thermals are found to be elliptical most of them will be elliptical throughout the day. In this case flying directly upwind or downwind will present the most lifting air and help you find the core.
Fig 7. Thermals and cloud character
Clouds based on thermals begin first in the morning and remain longest over the best thermal sources such as mountains. However, except for cap clouds over islands and high mountains, thermal clouds undergo a continuous decay and rebirth process.
Fig 7 shows the typical life process of an isolated cumulus cloud. Normally it takes more than one thermal to build such a cloud that lasts 20 minutes or so from the first wisps to final dissolution. As long as thermals feed it, it will grow. When thermals stop the cloud dries and dies.
In the lower part of the figure we show a schematic of typical cloud shapes as they age. Note how the point of the triangle shape is upward in the growing cloud while it is downward in the dying cloud as drying takes place near the bottom first when the thermal lift stops. Drawings one to three represent growing clouds. Four and five show cloud decay. Be careful not to mistake stage five for stage one.
Other signs of feeding or productive thermal clouds are dark, flat bases, sharp outlines and swelling or boiling cauliflower type heads on the clouds. Signs of dying or disintegrating clouds are wispy outlines of the cloud, especially near the base, a poorly defined bottom and a reduction in size. Colour is also an indicator of cloud health. A growing, robust cloud will be gray or white, bright or dark according to how it catches the sunlight. A dying cloud appears slightly off-colour and may take on a yellowish or brown hue because the small moisture particles evaporate first when it begins dying and this changes the reflectivity.
FIG 7 CUMULUS LIFE CYCLE
The typical life process of an isolated cumulus cloud. Normally it takes more than one thermal to build a fully formed cumulus cloud.
Drawings 1 to 3 represent growing clouds, while 4 and 5 show cloud decay. Don’t mistake stage 5 for stage 1.
The general strength of thermals and length of production can be correlated with how high and large a cumulus cloud builds. Stronger thermals surge higher in the cloud and longer lasting thermals make it larger. However, the character of the air has something to do with this, for many flat thermals are caused by the blockage effect of an inversion layer.
When too much moisture builds up at the cloud level, either because the thermals are moist or an inversion layer holds the moisture in a narrow band, the clouds will spread and turn into stratocumulus forms. Thermals may still be found in these conditions if some sun is allowed to peep through or the cold air is moving over warmer ground. In that case the darker areas of the base (and areas of towering cloud if they can be seen) are the places to find thermals.

